Saturday, 20 December 2014
Wednesday, 10 December 2014
Wednesday, 26 November 2014
The Rule of Thirds
The rule of thirds in a concept in video and film production, in which the frame is divided into 9 imaginary sections. Points of interest should lie on the grid lines, either one third or two thirds up the frame horizontally, or across vertically, compared to being positioned in the centre of the frame.
![]() |
The Rule of Thirds |
Close up
We were tasked to take 2 still images, one using the rule of thirds and the other breaking the rule of thirds. We did this to see how effective using the rule of thirds is. Also it allows us to see how we can break the rule of thirds for our advantage.In this example, David is positioned in the far right top corner, on the horizontal and vertical line. This is conforming to the rule of thirds. We use this positioning to make the shot look more natural, and draw the attention to the character positioned with in the shot, as it looks more prominent than being positioned in the middle of a shot.
Use of rule of thirds |
Breaking the rule of thirds |
Landscape
In the same way we can use the rule of thirds and apply it to a landscape shot to create similar effects.
In this example, we used the rule of thirds on landscape shot. In a similar way to a close up, it creates a sense of reassurance and trust of the location making it seem like a safe place, like any ordinary place.
Use of Rule of Thirds |
Breaking the Rule of Thirds |
Monday, 17 November 2014
Preliminary Task Evaluation - Jason Burksfield
I think that we were very successful in our preliminary task. Our team worked well together and all of us contributed to the task. In the planning section, we wrote a brief script, which we stuck to. we also drew up a storyboard, but when we went to ilm, we felt that different angles would look better, so we changed some things from the storyboard.
Positives.
I think what we done best was our camera angles. i believe that we used a wide range of shots and they looked very professional. we used establishing shots, and lots of different close ups, and long shots of the hall. I feel we done well sticking to the rule of thirds and the 180-degree rule. We also used shot reverse shot for the conversation between the two characters.
![]() |
Long shot |
![]() |
Medium Shot |
![]() |
Close up |
Improvements we made.
One problem we experienced was the background noise. as it was filmed in a room open to other students, we could not control the sound of conversations which changed for every shot. This would have affected the continuity, but in the editing process we have managed to control that.
Storyboarding
Before we started
filming, we made a storyboard based on our initial ideas. Storyboarding is easily understandable, and helps us explain our ideas clearer to the rest of the group, rather than trying to describe it. when
our ideas are illustrated on paper as it gives us a clear depiction on what we
intend to do. It also lets us explore ways in which we can approach particular
scenes in terms of the types of shots we're going to use. we did however change some of our storyboard when filming, but in general, we stuck to it well.
![]() |
An example of a storyboard |
![]() |
diagram explaining the 180 degree rule |
180 Degree rule/ Shot reverse shot
We used the 180 degree rule in the conversation between Joe and David. this is to not confuse the audience because if we did not use the 180 degree rule it might look like the characters have changed positions. with using the shot reverse shot technique and sticking to the 180 degree rule, it is clear the characters have not moved.


Continuity/ Match on Action
Continuity was important so that it looked like one continuous motion, rather than it being stop start. also, it must not look like it was filmed at different times, so all of the lighting, background and elements of mise-en-scene must look the same in all shots.
Sunday, 16 November 2014
Preliminary Task Evaluation - James Parkhouse
I filmed this preliminary task with Evan De Roeper, and Janith Perera. I think that considering this was our first time working together, we worked well and we coordinated everything well.
During the filming of our
preliminary test video, we encountered some problems that we had to overcome.
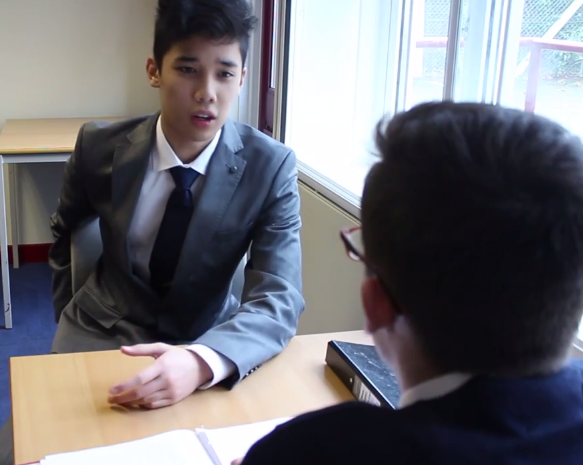
Firstly, after filming we realised that we had not fully filmed a shot reverse
shot. We noticed this couple of weeks after filming, while we looked different
due to haircuts and wearing different clothes, so we had to come up with a
different way of filming a shot reverse shot which would not spoil the
continuity of the scene. We decided to film an interrogation style shot that
would be set a few days after the events of the original filming, so that any
change in appearance would be acceptable and not ruin the continuity.
![]() |
Shot Reverse Shot |
Another challenge we faced
in the editing process concerning the continuity of the video, was syncing the
close up shot of a hand opening a door, with a long shot of someone hen walking
through the door, from the point of grabbing the door handle and opening the
door halfway in the previous close up shot, creating match on action.
To not ruin the continuity of the
shot, we had to make sure that the shots were perfectly synchronised, so that
the second shot would start perfectly on time and the same point as when the
other ended. We did this Adobe Final Cut Pro and used a trial and error
technique, cropping the video length until it looked right. We then had to do
the same thing after the long shot of someone walking through the door way, by
putting a close up shot of feet walking through the door afterwards, making
sure the shots so were synced so that it looked like the shot of the feet
walking started at the same point as where the feet got up to in the previous,
to keep a sense of continuity.
![]() |
Match On Action/Continuity |
Match On Action - We managed to successfully film and match on action shots so that they maintained continuity. We managed to do in the stair scene, and the opening of the door. Continuity is important within a film as it means everything flows fluently, and consistently, helping to add a sense of professionalism to the product.
![]() |
Continuity Editing/ Match On Action |
![]() |
Over the Shoulder Shot |
![]() |
Mid Shot |
![]() |
Long Shot |
Improvements:
180 Degree Rule - Despite following the 180 degree rule at times, we broke it a couple of times during filming, such as in the POV perspective shot from Janith. This could cause unnecessary confusion among an audience, and cause the product to look less professional.
![]() |
The 180 Degree Rule |
![]() |
The Rule of Thirds Grid lines |
![]() |
Breaking the Rule of Thirds - Unprofessional, amateurish appearance |
![]() |
Breaking the Rule of Thirds |
![]() |
Following the Rule of Thirds - Looks more professional |
Overall, I think that our preliminary test video was fairly successful as we managed to use a wide variety of shots, and successfully incorporate match on action, and maintain continuity. I feel that we managed to overcome the challenges we faced successfully, and managed to make a fair attempt of a short video that highlighted a variety of shots and camera angles.
However, if i were to improve it, I would follow the rule of thirds and 180 degree rule more, unless breaking the rules to create effect. I would also spend more time in the planning stage, and create an in depth story board and shot list so that we did not have to make it up on the spot, and forget important aspects such as shot reverse shot.
Saturday, 15 November 2014
Preliminary Task Evaluation - David Brady
Preliminary Task Evaluation - David Brady 4252
In my group for the preliminary task was, Joe, Jason and myself. I think that our preliminary task went very
well, I thought we worked well as a team to get the task completed. We discussed a numerous different type of
camera angles and movements before we started filming, using the pre-production
to plan out our scene, as well as using a storyboard to plan out or preliminary
task. We used this to plan the type of shot we wanted and how we wanted it to look.
I think the camera angles and movement were
our best part of our production. We used a vide range including “medium close
up”, “over the shoulder shot”, “wide shot”, “close up” and the compulsory shot
reverse shot.
![]() |
An example of a "long-mid shot" |
![]() |
A example of a "close up" |
180 Degree Rule
We also used 180-degree rule effectively, using it to keep contiguity. We also made sure that throughout filming we kept the contiguity of the scene. Especially when filming the conversation between myself and Joe, as if we broke the 180-degree rule we would confuse the audience as the actors would be switching sides. We did this by making sure that throughout nothing changed between the shots. Keeping the continuity of the shot.![]() |
"The 180 degree rule" |
Match-On-Action
We used "match on action" to make sure the continuity flows. we did this when Joe walks through the door. As when he opens the door we swap to the other side to see him walk in. However we had to make sure that when he walks through it doesn't seem to jump backwards and that it flows as he walks in.Shot-Reverse-Shot
We also used the "Shot - Reverse - Shot" to create a feeling of a more realistic conversation, but we also had to make sure we didn't break the 180 degree rule. As otherwise the continuity would be ruined.![]() |
Here is an example of "Shot-Reverse-Shot" |
Improvements
However we could have improved our planning
by going into more depth. We also could have checked the lighting for each
shot, as some of the shots were dark and could have used extra lighting. One problem that we experienced while filming
was background noise. As we were using a room open to other students we
couldn’t control how loud they were throughout the filming, this has lead to
edit the noise levels while editing. We
could also have white-balanced before every shot, instead of having to re-shoot
some shots that we used.
![]() |
This is an example of a shot that we could have added extra light. |
Composed by Joe, David and Jason.
Friday, 14 November 2014
Preliminary Task Evaluation - Joe Tiongson

- We followed the 180 degree rule and also used the continuity technique effectively. We worked well as a team to get the task completed whilst discussing numerous types of different media shots and angles to get the best image before we started filming with the help of creating a storyboard during pre-production to get a rough view of how we were going to approach this task.
IMPROVEMENT
- A way to improve in our group tasks would be that we should be more aware of the lighting in the room and whether it would suit our previous shots so there won’t be a drastic change in room lighting, another aspect would be sound; we should be more aware of the sound of the room so again it would suit out previous shot because it can’t go from quite to a sudden loudness; a way we overcame this was when it came to the editing where we adjust the sound into one volume and add background music if need be.
- We could improve by white balancing the camera from the very start before we start filming rather than adjusting it and re-shoot because it would be more efficient. Another way we could improve was the planning; the planning was quite minimal and we could more in depth on it next time by having a more effective story board with discussion of the possible camera angles we could shoot it in and a more detailed evaluation on why an angle would be the best one.
Storyboarding
Before our group actually started filming, we sat down and generated a storyboard of our initial ideas. Storyboarding helps save time in pre-planning and is easily understandable when our ideas are illustrated on paper as it gives us a clear depiction on what we intend to do. It also lets us explore ways in which we can approach particular scenes in terms of the types of shots we're going to use.
Example of a "storyboard" from Warner Bros. Harry Potter |
Preliminary Task
Camera angles
I'd like to think that the camera angles and movement was what we spent the most time and effort on before, during and after our production; we used a wide range of shot varieties from 'Long shot' to 'shot-reverse-shot' to demonstrate our understanding and ability to put the techniques we've learnt
into our preliminary task.
![]() |
Example of "Establishing shot" |
![]() |
Example of "Medium close-up" |
![]() |
Example of "Long shot" |
Shot-reverse-shot
Shot-reverse-shot is used in our preliminary task to present a more realistic conversation between David and I. Whilst filming we kept in mind the 180 degree rule and kept onto one side when switching between David and I because if not we would confuse the audience as the actors would be switching sides. Both the 180 degree rule and the 'Shot-reverse-shot' in this part of the filming is used to create continuity and made the scene more fluent and natural.
![]()
| ||
Our example of "shot-reverse-shot" |
Match-on action
We used match-on action in the production because that was our main goal to present as its a vital aspect to making sure that the continuity flows throughout. We presented this skill when filming myself opening and walking through the door; as I approached the door we switched to a shot where its a close up of my hand turning the handle then shortly after Jason and David swapped to the other side to film me walking in.
I had to do this process twice to they could be put together and be more fluent in post-production.
Subscribe to:
Posts (Atom)